|
1 2 |
|
|---|---|
| Posted by | Comprehensive February Guide |
 Terrinthia [G1] (#97101) 
View Forum Posts  Posted on 2025-01-23 18:53:43 |
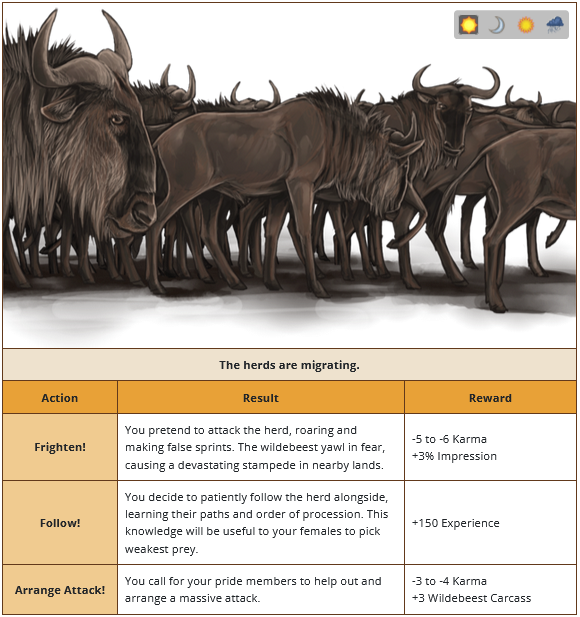
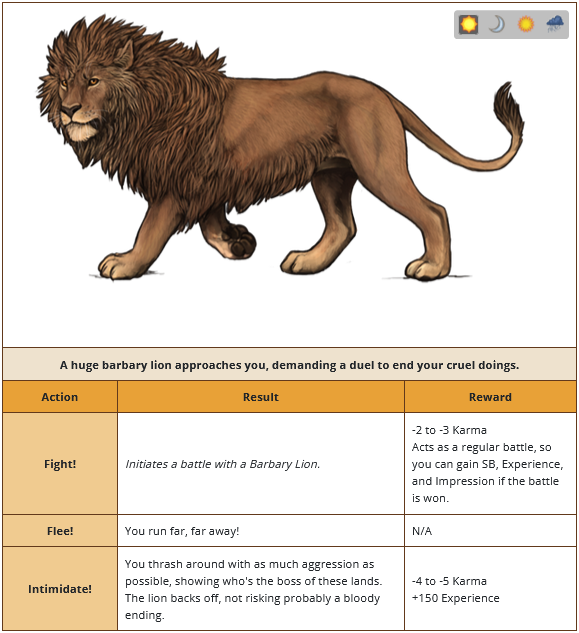
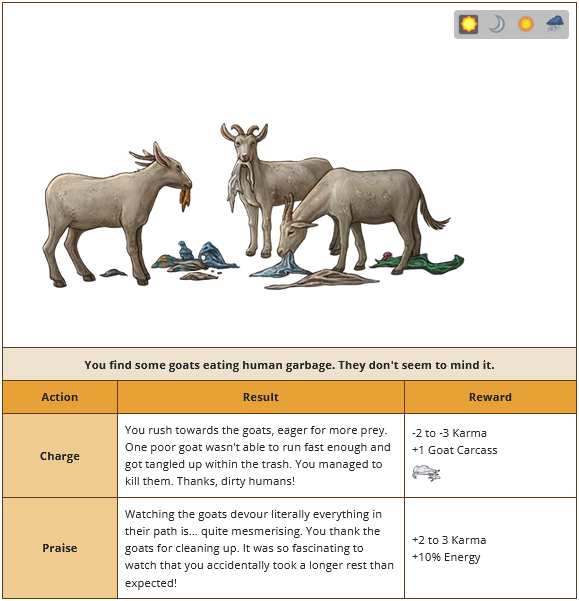
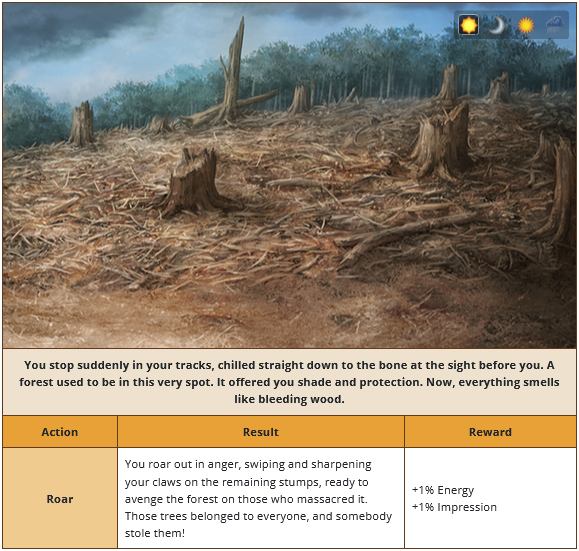
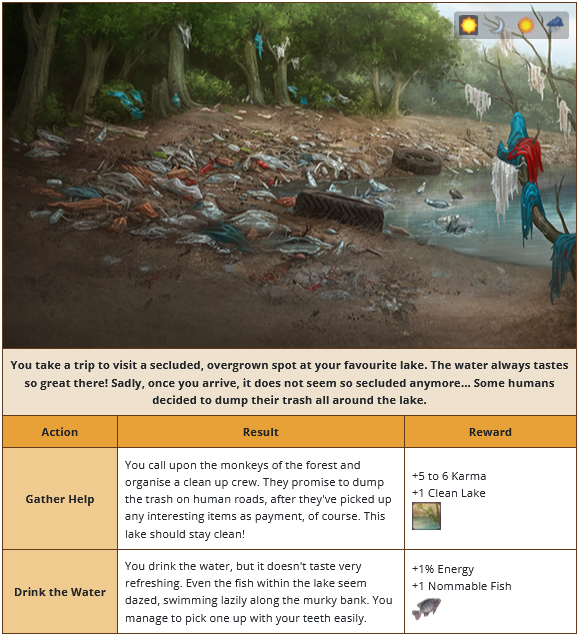
Most Comprehensive February Guide... Perhaps You seem to have stumbled upon a dusty, tightly bound scroll. With a deep breath, you blow off the dust - but your clumsy paws accidentally allow the dang thing to slip away from your grasp! The scroll unfurls, the slightly sloping ground allowing it to roll and roll and... roll... Good heavens, it's still going? Whoever wrote it must have been completely crazy! Reading it may take a while. Hey there folks! I made a guide for my (and many other players') favorite month  As a disclaimer, this thing is a bit long. A smidge, really. It'll be broken into several comments, and I've included a table of contents below for easier navigation. As a disclaimer, this thing is a bit long. A smidge, really. It'll be broken into several comments, and I've included a table of contents below for easier navigation.Introduction | Aphrodisia | Exploring Additional Energy | Energy Items | Misc Items Other Energy Sources | King Personalities | Avoiding Burnout What to Buy | What NOT to Buy Conclusion | Heart Shell Tracker TL;DR To read this in the form of a Google document, click here! Introduction February is a rather simple and straightforward event. You explore and interact with event encounters to gain Heart Shells (HS), the event currency for the month. It is one of the best events to make money on because many players want to stash a bunch of the breeding items obtained from the shop, and the items themselves are actually rather easy to grind for in comparison to most other events’ items. In February 2024 I was able to get nearly 16k HS for myself total using two accounts with energy items and such, but I’d estimate 6-8k is more to be expected for players who are online a lot but have no energy items. This month is NOT a battling event. Save your precious energy for other encounters! You are free to battle if you wish to get experience for your king as well as a bit of SB, but it will hinder your overall HS gathering. Event-specific battle encounters, such as the “Hoarding Lion” shown next to a large pile of HS, carry such negligible currency rewards that you would be better off just skipping the encounter and hoping for another one within the 10% energy the battle would have consumed. Unfortunately, breeding is suboptimal during heavy explore grinding events like this one, so try to avoid it if possible. Every attempt costs 5% energy, so Very Low Fertility (VLF) lionesses in particular are likely going to suck up a lot of energy that you could use for more exploring instead. If you need to breed for projects, it’s a good idea to have enough SB on hand to purchase a few Chasteberries for particularly low fertilities. My rule of thumb is to only breed lionesses above 30% fertility, which is roughly a ⅓ chance of success. Of course, you can still be unlucky and end up wasting full energy bars on breeding attempts, but it can’t really be helped if your lionesses have to be bred. Aphrodisia In addition to exploring for HS, there is also a fun little feature in February known as “Aphrodisia” located on the Event page. Every 15 minutes, your king can Flirt with a lioness from another player’s pride. The lioness is selected at random from among all of the players currently online, and you can only flirt with one at a time every 15 minutes. I’ve noticed the best time to flirt and slap is between roughly 11pm-5am Lioden time, when less players are online. The reason the lioness is selected from only online players is so that they have a chance to discover the flirter and Slap him! This has a 15 minute timer as well. Once a king begins flirting with a lioness, that timer starts counting down and the lioness’s player has 15 minutes to return to Lioden in order to attempt to chase the king off, which has roughly a 50% chance of success or failure. Successfully slapping a king grants 1-3 HS, but failing grants 1-3 HS to the other player! If the flirtation takes place with no attempts to slap, the flirting king will get a guaranteed 1 HS. I feel it is always best to try to slap if you can. Worst case scenario, the other player can potentially get a few more HS for themselves! Because you can flirt every 15 minutes, many players find setting alarms to be helpful in maximizing the number of times they try flirting each day. I unfortunately can’t stand them these days, but when I used to use them, I’d usually just go with “Google timer” since it’s convenient. You can use an app, though, or a specific website - whatever you like best! Set it for 15 minutes and manually re-set it once you’re finished flirting (and slapping, if you have any pesky kings hanging around your lionesses!) - Be aware that the number of lionesses in a player’s territory do NOT affect the chances of other kings flirting with them! The game first rolls to determine the player, THEN it rolls to determine which of that player’s lioness gets flirted with. So don’t worry if you only have 1 lioness, you will get roughly the same amount of opportunities to slap other kings as a player with 200 lionesses. I’ve never had zero lionesses before, so I’m not 100% sure whether you’ll be included without any. Participating in Aphrodisia as much as you can makes a large impact on the amount of heart shells you’ll gather, so it's definitely a good idea to try to come online as often as you are able! Don’t fret if you can’t log in every 15 minutes, though; for most players, the majority of their HS will come from exploring. Exploring When it comes to getting the most event currency, I always always always recommend at least taking a peek at the event’s explore encounters on the wiki. For all the folks who aren’t exactly new to February, it has been nearly a year since our last time seeing them, so there’s no shame in having forgotten the best options to choose! Even though I have played through quite a few February events myself, it’s still very helpful to get a refresher for which buttons I’ll want to click for each of the event encounters. Some players keep a wiki tab open at all times while exploring, while others only open the wiki a few times during the month. I lean more towards the latter as I’m primarily a mobile player, and my phone sometimes likes to refresh the page I was on if I swap to another tab. Not very helpful if I haven’t clicked anything yet for the event encounter I was on, so I try to avoid switching tabs if I can. But it all depends on personal preference (and hardware capabilities, if applicable). At a base level, with a non-hungry king, energy is restored by 10% every 15 minutes. That means it will fill from 0-100% every 2 and a half hours. Try to explore at least that often, minus of course times where you are asleep or otherwise unable to play. However, it is preferable to not let your energy fill up fully before exploring again because if you get “lucky” with the random +15% energy encounter at 96% energy, you’ll only get +4%. A good sweet spot would be to explore when your energy is around or below 80% in order to avoid potentially missing out on those small scraps of energy. Unless you have valuable lions frozen on your side account, you’ll definitely want to roll both of your accounts every day for exploring to maximize how much you can get. That alone will double your potential HS gain, as you’ll have two free energy sources that you can use instead of just one! If you have a lot going on in real life (or anywhere, really) and can’t commit to rolling and grinding on two accounts daily, though, it’s perfectly fine to just work with one. Mental health is important, and you don’t want to get too stressed out!  9 players like this post! Like? 9 players like this post! Like? Edited on 23/01/25 @ 19:05:11 by Terrinthia [G1, semi-frozen] (#97101) |
 Report
|
Terrinthia [G1] (#97101)
View Forum Posts Posted on 2025-01-23 18:53:46 |
Additional Energy February is one of the most common months players stock up on energy items specifically for. While you can absolutely gather a respectable amount of heart shells without using any energy items, using items makes it far easier to gain a LOT more. Anything that can give you more opportunities to potentially find this month’s event encounters will give you a boost to the amount you can end up with. Luckily for us, many such items exist. It is ideal to stock up several months in advance when prices for them are lower, but if you’ve just found my lil’ guide on the cusp of February it may be too late to get some of these items for reasonable prices… but at least you’ll know for next year! Standard Energy Items Miscellaneous Items I wasn’t really sure if these belonged in the same category as the other actual energy items, so I made them their own little section. It’s optimal to use these items at the same time when possible and spam as many Energy Boosts as you can during the time that they’re active. Each item directly benefits the other(s) when used together for their limited durations. Avoid claiming any NCLs or doing any battles during this time so that you don’t waste needless minutes.  I probably will give it a shot, for science! 4 players like this post! Like? I probably will give it a shot, for science! 4 players like this post! Like?Edited on 23/01/25 @ 19:02:16 by Terrinthia [G1, semi-frozen] (#97101) |
|
Terrinthia [G1] (#97101)
View Forum Posts Posted on 2025-01-23 18:53:49 |
Other Energy Sources Don’t have much in terms of energy items? Well, that’s alright! The site has some other places to get energy from. Some of them are a guaranteed flat amount that you can count on each time you are able to use them, while others are more up to chance. I’ll list them below in order of reliability. I will be a bit more in-depth with my descriptions of each, which will be hidden within spoilers to keep it a bit more tidy. Daily Energy Boost Leveling Up Gorilla Enclave Different Explore Zones Old Lioness King Personalities There are two personalities that really shine during February, as well as other explore-heavy events that don’t have a lot of battles: Hyperactive and Candid. Both of them are easily obtainable with a Sangoma Lion Mask (purchasable from the Personality Snake in Crossroads) which costs only 400 SB. Which one you should choose depends on your personal playstyle, as well as the number of available territory spaces you have and the amount of time you can spend exploring. Hyperactive - Adds a button that can be used once per day to gain 30% energy if your energy is below 70%. Very simple, straightforward, and quick to use, as it requires only one click to instantly get that bit of energy. Candid - You now gain 3% energy each time you successfully claim an NCL in Explore (though it does not give you energy for lionesses auto-claimed with GB or Leopard Orchids). If you can claim at least 11 lionesses each day, it outclasses Hyperactive. Personally, I choose Candid because I have a lot of territory and can comfortably fit at least 50 lionesses until the end of each day, or at least until I get a chance to cull or sell them. With the use of energy items, I typically claim over 30 lionesses per account, often more, so having all that extra space ensures that I won’t miss out on chances to claim due to my territory being too full. An easy, relatively successful method I use to claim most NCLs is Snarl > Shake Mane > Puff Out Chest > Bite Neck. If you don’t have a lot of open territory, I would probably recommend Hyperactive. It becomes annoying having to constantly clear out lions every hour when their cooldowns are up, so that can contribute to burnout when you have to do it all the time. Which brings me to… Avoiding Burnout Oh god, the burnout. Even I’m not immune to it, despite being super excited to grind this event every year. During February, regardless of the day, I always use 2 Roasted Lambs per account to have double energy regeneration for 16 hours of the day, so that’s a lot of energy to get through. Sometimes if I happen to be busier during the day than anticipated, it’s very difficult to find the time to clear out my energy bars every hour when they reach 80%. Especially on days where I have to work and there’s a lot to do, it’s sometimes not entirely feasible to take a quick 5 minute break and get rid of my energy. I used to agonize over missing a few ticks of energy from being at 100% for too long (because oh my god I missed out on 60% energy?! NOOOO, that’s half an energy bar!) but it helps to just put it to the back of my mind and not think about it. In the grand scheme of things, it’s not the end of the world to miss out on some energy. Any amount of HS you get is a positive, after all! If you find yourself getting a bit too stressed out from the game, you can take a short break. It’s not "ideal", but maybe spending a day or two, or even a few days off Lioden to rest might be a good idea to rejuvenate yourself. The event is not worth losing sleep over, I promise! I’ve seen people quit the game right after pushing too hard during grinding months because it was just too overwhelming to deal with all of the pressure of the event on top of whatever else they had going on in real life. Try to at least make your way back online before the end of the month so you can spend whatever HS you have before the shop goes away, though! While there is always next year, it really sucks having to wait a full year if you were counting on getting those Heart Shell items to either sell to other players for currency or to keep for your own projects. 4 players like this post! Like?Edited on 23/01/25 @ 18:55:18 by Terrinthia [G1, semi-frozen] (#97101) |


|
Terrinthia [G1] (#97101)
View Forum Posts Posted on 2025-01-23 18:53:53 |
What to Buy Whether you are selling your heart shells to other players this month or saving for later, these are the items people are most likely to want: There are stat items available that some people look to stock up on. Some are better than others when it comes to price vs benefit, so I’ll list the better ones here: The decor and applicators of this event are good as well! They may not necessarily sell as nicely as the breeding items (the applicators cost more HS and don’t typically fetch quite as high of a price later in the year), so I usually just recommend buying what you want. I’m honestly a sucker for all of the backgrounds, so I usually end up buying some of the one’s I don’t have any more copies of each year. What NOT to Buy Of the 12 total stat items available this month, I’d only recommend about 4 of them as "viable" purchases. Avoid buying the lower tier stat items that cost the same amount of HS as other better options: These next two items are the only other ones I’d really vehemently oppose buying at all. Anything else in the shop is fair game, really! 4 players like this post! Like?Edited on 23/01/25 @ 19:00:18 by Terrinthia [G1, semi-frozen] (#97101) |
|
Terrinthia [G1] (#97101)
View Forum Posts Posted on 2025-01-23 18:53:57 |
Conclusion I always wanted to write a guide; thank you for reading it! I know it was tedious and rather long-winded, but think of it this way: if you can stand to read my lengthy ass writing, surely you can survive the mind-numbing monotony of grinding your butt off in February  Honestly, I shoved so much crap in here that there’s a high chance I forgot to add something. I’m open to hearing about your own strategies as well if you’ve played through February before with a good amount of success! And don't be afraid to comment here with anything you’d like to mention Heart Shell Tracker Spreadsheet If you’d like to TRACK your Heart Shells this month, please click here to view a Google spreadsheet I made that you can input your HS amounts each day to see a running total, amount gained per day, average over the course of the month, and a neat little bar graph c: I have it set to View Only privileges, so in order to edit in your own values, click File > Make a copy and save it to your own Drive. In the first "Rollover Amount" cell for each respective account, put the amount of HS you started the event with. For some folks that amount will be a number other than zero depending on whether you played a past February event and had any left over! This time I have enlisted the help of friends to finally get the Average to stop giving negative values until the full month is filled out! Any time you make a purchase (e.g. 10 Buffalo Scrotums for 600 HS), record the total number of HS spent in either the D or E columns (titled "Purchases" with the correct account) for that day, otherwise it will be confused that your HS amount per day went down without explanation, and it won’t add up the proper amount for your total. Let me know if you have any questions or problems with the spreadsheet working, and I’d be glad to (try to) assist Happy grinding! 3 players like this post! Like?Edited on 03/02/25 @ 22:38:02 by Terrinthia [G1] (#97101) |
|
Terrinthia [G1] (#97101)
View Forum Posts Posted on 2025-01-23 18:54:02 |
TL;DR Gain currency by exploring and flirting/slapping every 15 minutes. Set alarms if needed. Avoid battling. Don’t breed lionesses with very low fertility (lower than 30%, generally). Check the explore encounters on the wiki to pick the best options. Explore with both accounts at least every 2 and a half hours to use all of your energy if you aren’t using double-regeneration items. Explore every hour if you are using double-regeneration items. Energy Items list: Miscellaneous Helpful Items (use multiple at the same time when possible, and don’t waste time claiming NCLs or battling!): Other Energy Sources: Do your best to grind as much as you can, but don’t stress out! Take a break if needed. Make sure to spend your HS before the event ends! The best items to buy are almost always going to be Yohimbe Barks, Buffalo Scrotums, and Lion Scrotums from tier 3 of the Flirt and Slap Shops. Don’t buy Leopard Orchids or Baobab Fruit! They’re not worth their price. Pretty much anything else is fair game though! Heart Shell Tracker Spreadsheet (Google Sheets): LINK To edit in your own values, click File > Make a copy, and save it to your own Drive. Any time you make a purchase (e.g. 10 Buffalo Scrotums for 600 HS), record the total number of HS spent in either the D or E columns (titled “Purchases” with the correct account). 4 players like this post! Like?Edited on 23/01/25 @ 18:57:27 by Terrinthia [G1, semi-frozen] (#97101) |
|
Terrinthia [G1] (#97101)
View Forum Posts Posted on 2025-01-23 18:54:05 |
|
🌙 Morrígra 🌙 [G1 Mazi RLC] (#33027) View Forum Posts Posted on 2025-01-23 19:06:31 |

|
Kamari (#85227)
View Forum Posts Posted on 2025-01-23 20:59:31 |

|
Wyrm G1 3K Flint 4x Hybrid (#450143) View Forum Posts Posted on 2025-01-24 07:54:33 |
commenting with a hypothethical question ; would you think it'd be better to simply get the 2  energy boost , in order to spam the event encounters for 15 minutes whilst using hyena butter, coffee beans & sirens' call ? energy boost , in order to spam the event encounters for 15 minutes whilst using hyena butter, coffee beans & sirens' call ? i'm debating how exactly i can effectively use these items, since they don't inherently work well with items like roasted lambs and red bulls, and it seems much more expensive to buy more exp items instead of just using energy boosts to get several bars (enough for 15 minutes of non-stop explore). essentially, do you think a energy bar on average will given more than 20 HS (assuming 1 / 10 HS ratio) , to make the 2 energy bar worth it ? 2 players like this post! Like? |

|
Terrinthia [G1] (#97101)
View Forum Posts Posted on 2025-01-24 08:15:11 |
Wyrm - Thank you for the question! Personally I've never been good at counting "event currency per energy bar" as my own explore style usually doesn't have me using full energy bars at once, but I have heard from others that they do tend to average 15-30 HS per bar depending on how lucky they get with encounters. Of course, using those 15-minute items should theoretically bring the average toward the higher end of the scale, though it is still dependant on luck. I wouldn't advise using them at all if you don't plan to use energy boosts for the duration, as it is true that they won't be very useful with just the natural regeneration timer being every 15 minutes as it is. I'd estimate players tend to average 6-9 energy boosts used in a 15 minute span based on click speed, so I think it would be a good idea to buy 10 of them just in case, each time you plan to use coffee beans and whatever other items. I'll make sure to pay attention and record a comparison between several energy bars with no special items used, and several energy bars with coffee beans and hyena butter used, as those two items are the easiest to obtain for most players! 1 player likes this post! Like? |
|
🌙 Morrígra 🌙 [G1 Mazi RLC] (#33027) View Forum Posts Posted on 2025-01-24 15:05:51 |
I believe my luck is pretty bad, I averaged last year I think 10 HS per bar but I know others around me were usually significantly higher. And I always ONLY used boosts while buttering and beaning as well, and I think averaged then more like 20+. Haven't tried sirens call or sanafica because I doubt the drop rate increase would be worth the price. Remains to be seen, hopefully someone comments on here that they've used them and it was subpar or extremely good 1 player likes this post! Like? |
|
Syx|Temporal|Overo|M NRCL (#374987) Famous View Forum Posts Posted on 2025-01-28 01:32:00 |
Thankyou so much! This is my first year to properly grind!! Cant wait! 1 player likes this post! Like? |

|
Moom.v2 (G1- Incense NRLC) (#344289) Bone Collector View Forum Posts Posted on 2025-01-29 13:51:21 |
I love the "perhaps" First February ever since my first. Thank you!! 1 player likes this post! Like? |
|
cinna (#174234)
View Forum Posts Posted on 2025-02-03 22:06:13 |
hi there!! i wanted to double check since ive been using the tracker (which is incredible btw!!) and only just now realized i may be using it wrong--do we put in how many HS we make per day? or our amount at the end of the day if that makes sense? sorry for the weird question, thank you so much for this guide!! 0 players like this post! Like? |

|
Terrinthia [G1] (#97101)
View Forum Posts Posted on 2025-02-03 22:23:22 |
The tracker will calculate the amount you make per day on its own! In the "Rollover Amount" cells you'll put the number of heart shells that you have currently on each account at the beginning of your day. To keep it simple, I would probably recommend inputting the amount on each account into their respective cells right when you wake up and roll over for the day c: Or you can grab the amount you have each Lioden midnight, whatever works for you! Timezone differences may make one option more appealing than the other, but as long as it's roughly the same each day it won't affect much besides the "amount gained" between different days. 0 players like this post! Like? |
1 2 |
|---|
Memory Used: 709.83 KB - Queries: 2 - Query Time: 0.00037 - Total Time: 0.00545s